Menu
andrewgrabbs.com
  • Home
  • Cycling
    • Bicycle Builds
    • Events
    • Nutrition
  • DIY
andrewgrabbs.com
March 18, 2023December 24, 2023

We Ride South DIY Rocker Plate Plans

I initially set out to provide the lowest cost, highest value, rocker plates to the masses because (at the time) the highest functioning rocker plates were $1,000+ USD. With inspiration from the Rocker Plates Facebook group I came up with the V1 of the Ride South rocker plate which I released the plans for free. I then started working on a V2 version which I had planned to sell for the low cost of $350 USD.

Fast forward to now and few dozen rocker plates sold and I just do not have the time to support the side project coupled with the fact that multiple “companies” have taken my plans and are now selling them as their own with very little modification. I have decided to just release all of the plans and source files and that is what this webpage is for.
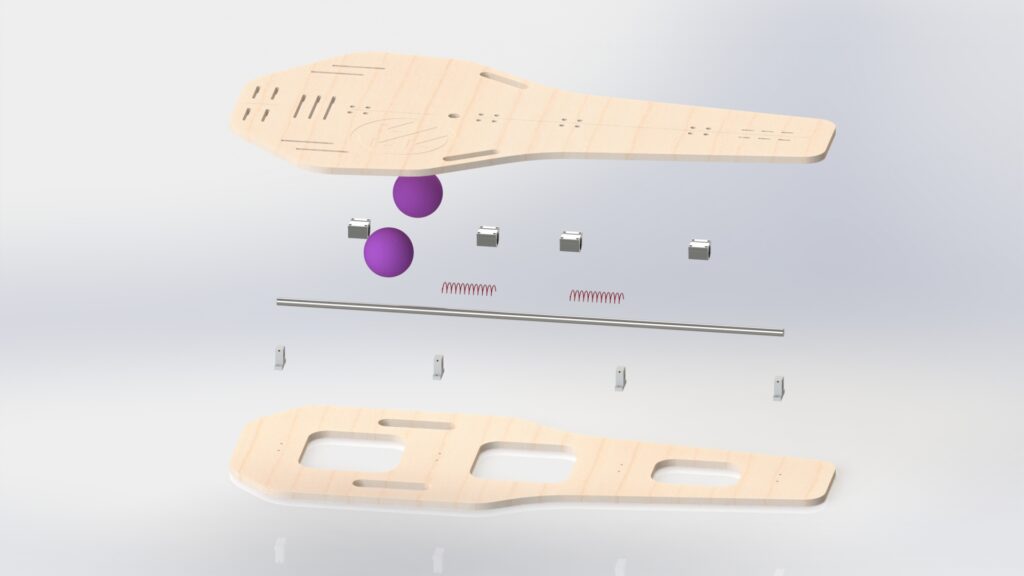
Parts List

In the manner of transparency, the links in the below table are mostly affiliate links where applicable. It costs you nothing to click them and helps me justify making more things to release for free in the future. (also worth noting, these are all parts required for the project and not random crap I am trying to sell you.)

# PARTPART #SIZEQTYAlieBayAmazonGraingerAllied
1Top PlateDIY18mm Birch Plywood1–––––
2Bottom PlateDIY18mm Birch Plywood1–––––
3RisersDIY3mm wood/plexi/delrin4–––––
4Bullseye Level o2H36637mm x 7mm1linklinklink––
5Linear Rod32*720mm x 1400mm (55″)1–linklink––
6Linear BearingSCS20UU/SBR20UU4linklinklink––
7Linear Rod SupportSK204linklinklink––
8Springs121292137mm x 27mm2––link–link
9Top Plate Bolts26LG41M6-1.0 25mm/30mm16–linklink––
10Bottom Plate Bolts6EY59M6-1.0 30mm16–linklink––
11Top Plate Washers29DH69M6 x 128–linklink––
12Bottom Plate Lock Nuts26LJ85M6-1.08–linklink––
13Inflatable Play BallsB07BGV41R75″2–linklink––
14Stage Clamps o2––link––
15Velcro Straps o3––link––
o = Optional

Notes

  • If you decide to go with SCS20UU bearings YOU WILL NEED RISERS.
  • The V3 rocker plate design DOES NOT support SBR20UUs.

Files

PARTSBR20UUSCS20UUMEASUREMENTSPRINTABLES
Top Plate V1Google DriveGoogle DriveSingle / Multi
Bottom Plate V1Google DriveGoogle DriveSingle / Multi
Top Plate V3Google DriveGoogle Drive
Bottom Plate V3Google DriveGoogle Drive
RiserGoogle DriveGoogle Drive

F.A.Q.

  1. Does this rocker plate have fore/aft & side to side movement?
    yes.
  2. What is the difference between SBR20UU and SCS20UU?
    mounting bolt pattern and stack height of bearing.
  3. Will you supply your source files?
    no.

136 thoughts on “We Ride South DIY Rocker Plate Plans”

  1. Aaron Berlin says:
    March 20, 2023 at 9:44 pm

    Love the video and instructions. I noticed a bunch of the affiliate links are busted and would love for you to get something from all this work. Do you have new links or recommendations for substitutions?

    Reply
    1. andrew the builder says:
      March 21, 2023 at 5:36 pm

      Aaron,

      Thanks! I’m working on converting everything over to this web page (away from the excel sheet that gets stagnant) and getting all of the links updated. I should have them done by this weekend.

      Reply
      1. Michael Reyeros says:
        April 9, 2023 at 3:03 pm

        Awesome video and instructions, I am also looking to use your build and instructions and would love to see the updated parts list if possible. Trying to see if I am able to get all the required parts here in Miami, FL. Was about to go out and purchase a pre-made rocker plate when I stumbled upon your video. I am of the mindset that if I can build it on the cheap and still get the desired functionality than why not.

        Reply
        1. andrew the builder says:
          April 17, 2023 at 3:04 pm

          I’ve went thru the parts list and the only thing I cannot find is the 20mm Linear Rod at 1400mm or 55″ long. I will continue looking.

          Reply
          1. Gabriel says:
            October 23, 2023 at 2:26 pm

            Hi Andrew,

            Love your project, thank you for sharing.
            Did you end up finding the 20mm Linear Rod?

          2. andrew the builder says:
            October 31, 2023 at 2:34 pm

            I haven’t found any online, but I do have some I can sell if you’re still interested.

  2. Paul says:
    March 21, 2023 at 8:21 pm

    I am assuming a 1200mm linear bearing will not work with this design? There is a kit currently listed on Amazon that includes (4) bearings, (2) 20mm x 1200mm linear rods, and (4) linear rod supports for $40.

    Reply
    1. andrew the builder says:
      March 21, 2023 at 9:21 pm

      Paul,
      You cannot go shorter on my specific design as the linear rod mounts are positioned for the 1400mm, but you can go longer, you’ll just have some rod sticking out the front or back. Hope that helps.

      Reply
      1. Paul says:
        March 22, 2023 at 1:49 am

        I thought it would be an issue, doesn’t hurt to check. I’ve been shopping around for linear rod since the amazon one is out of stock, have you tried any of the hollow rods?

        Also, on the counter sunk holes, I am assuming you put a washer in before the cap screw, what is the depth of the larger hole countersink?

        Reply
        1. andrew the builder says:
          March 22, 2023 at 2:26 am

          The hollow rods should work just fine as long as they are hardened. I was actually going to order those when I ran out of the solid linear rod stock I have as it would reduce the shipping weight by quite a bit. I did use washers on the counter sunk holes which are 7.5mm deep. On my latest design I skipped the washers and flat head bolts and used tapered head bolts to avoid using washers.

          Also, if you’re in the DFW I have some 1400mm rods in stock I could sell separate. It probably wouldn’t be cost effective to ship one.

          Reply
      2. Scott Wentz says:
        September 14, 2023 at 11:44 pm

        couldn’t you cut the rod to 55″/1400mm?

        Reply
      3. John Flack says:
        November 2, 2023 at 5:06 pm

        I’ve also had a tough time finding 20x1400mm linear rods. do you happen to still have any to sell?

        Reply
        1. andrew the builder says:
          November 6, 2023 at 7:34 pm

          I have some if you’re local to the Dallas, TX area. Unfortunately I cannot ship them.

          Reply
      4. Noah Thomas says:
        November 15, 2024 at 10:48 pm

        Hi, 1200mm would work if you just used different mounting holes yes? Or is the length crucial for functionality?

        Reply
        1. andrew the builder says:
          November 15, 2024 at 10:54 pm

          If you use 1200mm rod you will have to adjust all of the mounting points. The springs I selected will allow for around 200-220mm of movement so you will need to make sure you have enough space on each side of the bearings so that they won’t collide with the standoffs.

          Reply
  3. Paul says:
    March 22, 2023 at 6:15 pm

    I will look around for some hollow ones, unfortunately I thought they would be cheaper but look to be more expensive. I did find a 20mm x 1500 mm non-hollow rod at Grainger for under $70 but it is not hardened. Everything I am finding else where are sold in pairs so they are about $160/$170 ish. Too bad I am not in in the DFW area, I am up in New England, sourcing a cheap rod may be the sticking point for this build.

    by tapered head bolts, you are using something like this? https://www.amazon.com/M6-1-0-Socket-Screws-Alloy-Steel/dp/B07S51Z6JS/ref=sr_1_6?keywords=m6-1+x+30mm+screw&qid=1679508538&s=industrial&sr=1-6

    Reply
    1. andrew the builder says:
      March 23, 2023 at 3:28 am

      I’d sell you one for 40$; unfortunately, the shipping on one is going to be ridiculously high as they are very heavy and long. Those are the type of bolts I migrated to.

      Reply
      1. Paul says:
        March 25, 2023 at 12:59 pm

        If anyone is looking I finally found 20mm x 60” rods decently priced on vxb.com for $57 shipped from the west coast to east coast.

        Reply
  4. Bill Halliden says:
    March 23, 2023 at 2:22 pm

    Hi is there any chance that you could send me the files to my email account please

    Reply
  5. Beerady says:
    March 30, 2023 at 11:11 pm

    I’m in Fort Worth and will take you up on the offer for the rod for $40. Please email me.

    Reply
  6. Paul says:
    April 5, 2023 at 1:23 am

    what is the center line on the V1 top plate? decorative of integral to the design?

    Reply
    1. andrew the builder says:
      April 5, 2023 at 12:58 pm

      It is for centering your trainer/bike. Even weight distribution is important to the mechanics of the plate. If you are not evenly distributed you will feel the difference pretty quickly.

      Reply
      1. Paul says:
        April 5, 2023 at 1:03 pm

        gotcha, so its just a shallow groove for indicating the center. Just asking incase the guy operating the CNC router has a question when he is making the cuts.

        Reply
  7. Dar Webb says:
    May 30, 2023 at 3:12 pm

    Hello Andrew,
    Thank you for making your plan available, this helps so much. I am building your design. I found a local cnc shop that will cut the plates. Can I ask you to email me the files for them to use? Thank you.

    Reply
    1. andrew the builder says:
      May 30, 2023 at 3:39 pm

      Dar Webb,

      The files are all available from google drive in the “Files” section on post. You should be able to click the google drive link to directly download them. I hope this helps.

      Reply
      1. Dar Webb says:
        May 30, 2023 at 9:12 pm

        I’m sorry, I know nothing about these DXF files. I did download those, but it just shows the two plates with no measurements. Is that all I have to give to the CNC shop?

        Thank you

        Reply
        1. andrew the builder says:
          May 30, 2023 at 9:41 pm

          Yes, those files contain the measurements for the person operating the CNC software.

          Reply
          1. Dar Webb says:
            May 30, 2023 at 10:51 pm

            Thank you very much Andrew, I appreciate it.

  8. Hein Frommann says:
    June 12, 2023 at 12:07 pm

    Great project and well presented. Thank you for sharing such an awesome idea I Located all the components except the balls. I tried Amazon but could not find that item number
    I will improvise on the top and bottom as no cnc guys around my area

    Reply
  9. Dar Webb says:
    June 14, 2023 at 5:26 am

    Hi Andrew,
    If I were to use the riser plates, for the SBR20UU bearings, do you know what size bolts I would need to use?

    Thank you

    Reply
  10. Spencer Heath says:
    July 17, 2023 at 10:16 pm

    Hey Andrew! I know you’re swamped, but I’m in the DFW area and would love to discuss commissioning one of these from you if you’re able – if not, I’d settle for sourcing one of those rods that seem to be so hard to come by. Please let me know!

    Reply
    1. andrew the builder says:
      July 19, 2023 at 10:04 pm

      Spencer, thanks for reaching out! I am sending you an email now.

      Reply
      1. Andy Dutcher says:
        November 29, 2023 at 12:04 am

        Andrew, I don’t want to impose, but wonder if you have any more of the rods available in DFW?

        Reply
        1. andrew the builder says:
          November 29, 2023 at 2:38 pm

          Yes sir I do, shoot me an email at andrew at andrewgrabbs dot com.

          Reply
  11. Steve C. says:
    August 2, 2023 at 1:48 pm

    Andrew, love this build! I’ve been able to find everything but the compression springs. Your link to the Amazon product shows “Currently Unavailable.” In the video, your part list shows the springs coming from Allied – I don’t know what company/site this is but would love to know if they do still carry them if you can give me their full name and/or website. Thank you, Steve.

    Reply
    1. andrew the builder says:
      August 2, 2023 at 8:54 pm

      Steve, thanks! The compression springs can be bought via this direct link to Allied: https://us.rs-online.com/product/rs-pro/121292/70636054/?m=70636054. I’ll update the post as well. Hope this helps.

      Reply
    2. Andrew Kelley says:
      December 10, 2023 at 12:08 pm

      I found some springs at McMaster Carr that look like they will work:

      https://www.mcmaster.com/2006N466/

      Reply
  12. Chris Crawford says:
    August 29, 2023 at 7:16 pm

    Thanks for the tutorial. I found this rail kit on Amazon for just under $50, and it came with everything I needed for the linear rod bearing. The rod is about 4″ shorter than the rod that you listed, but it works perfectly. I kept the second rod as a spare. I did have to make some spacers as you mentioned above.

    VEVOR Linear Rail Slide 2PCs 20mm x 1200mm Linear Bearing Slide Set with 4Pcs Block Bearings SC20UU+4Pcs Shaft Support
    https://www.amazon.com/dp/B0C1SCPP3L

    Reply
    1. Scott Wentz says:
      September 14, 2023 at 11:50 pm

      so you didn’t have any trouble mounting the bearings with the above design?

      Reply
  13. Byron M says:
    September 4, 2023 at 1:15 am

    Thanks, this is awesome. Do you know if this fits the wahoo kickr core?

    Reply
    1. andrew the builder says:
      September 4, 2023 at 12:58 pm

      You’re welcome! Thanks for giving it a read. The V2 design will fit the Wahoo KICKR Core.

      Reply
      1. muede says:
        September 17, 2023 at 8:42 am

        Hello Andrew,
        that is a very interesting project. Thanks for all your effort.
        I would like to set up a V2 board for my kickr core configuration, but sadly there is no link on your Google drive.
        Could you please send me a working link or forward the zip file to my email?

        Reply
  14. Aaron Danforth says:
    September 7, 2023 at 8:05 pm

    Hi Andrew,
    This is fantastic! Just dove in and ordered a bunch of parts and found a cnc guy in my area. I have a Kickr Core, so it looks like I need the v2 .dxf files but it looks like the link is broken. Could I get you to send me those? Thanks!

    Reply
  15. cody says:
    September 12, 2023 at 4:22 am

    Hi there,

    I was wondering if you had the files for the V2 that would fit the Kickr Core? I have the Core version with the straight support legs.

    Cheers

    Reply
  16. Scott Wentz says:
    September 15, 2023 at 12:28 am

    Thanks for your design. I hope to get one of these set up, but I need to find a local CNC shop. Also, would it be possible for me to edit the design to allow for a 1200 mm rod isntead?

    Reply
  17. Piotr says:
    October 9, 2023 at 1:39 pm

    Hey Andrew!
    I really like you project, but I guess it will not work with Elite Drivo I, which I own.
    Is there any chance that you can adjust your project to this trainer?
    Cheers!

    Reply
    1. andrew the builder says:
      October 31, 2023 at 2:39 pm

      Piotr,

      Thank you! Unfortunately at this time I don’t have the capacity to adjust the project; however, I have had people use Elite Diretos with my particular design. I hope that helps!

      Reply
  18. Torrel says:
    October 14, 2023 at 4:11 am

    I will be using the SCS20UU bearings following your instructions; I will need to use a riser. I can’t find any instructions on how to make or buy these risers. I’m going to forego finding a CNC guy in my area, and I’ll just be doing it myself with the saws/tools I have. Can you please point me to the dimensions I could use?

    Reply
    1. andrew the builder says:
      October 31, 2023 at 2:38 pm

      Sorry for the delayed response, here is the link for the riser plate:
      https://drive.google.com/file/d/1_RapH79j7H7eBe2XD-JVfd-4K1QpUmD1/view?usp=sharing

      Reply
      1. Christopher Martinez says:
        December 7, 2023 at 4:55 am

        How does the riser plate fit with the V3 SCS20UU bearings? I am able to see the plans, just have a hard time conceptualizing, and didn’t see any videos that helped show this. I likely will be doing this without a CNC machine, do you have a good way to see the specific measurements for v3? E.g do you have a specific iOS or computer program to easily view the DXF files?

        Reply
        1. andrew the builder says:
          December 7, 2023 at 1:00 pm

          Christopher,
          The risers sandwich between the top of the SC20UU bearings and the top plate, allowing for more clearance in the side to side motion. As far as a good iOS computer program, I am unsure. I modeled it in Windows. I did a quick google for “ios dxf viewer” and a few came up, but not sure if any are good or free.

          Reply
          1. Christopher Martinez says:
            December 8, 2023 at 3:38 pm

            Risers I saw the dimensions on your DXF file. Is this a piece of wood or metal? And what is the thickness?

          2. andrew the builder says:
            December 8, 2023 at 4:40 pm

            It can be wood/metal/plastic/. I have used wood and rubber (skateboard truck risers off amazon). Anywhere from 3mm to 5mm. It can’t hurt to use more, it’s just going to raise the top deck.

  19. Domenico says:
    October 18, 2023 at 5:45 am

    Hi, my name is Domenico and I’m writing from Italy. Excellent project. If I used springs with 2.5mm wire and 28mm external diameter but only 120mm in length… considering the slight compression I would have to give to stabilize the upper board, would the oscillation be little?
    Otherwise I could use springs with 2mm wire and 28mm diameter with a length of 150mm.
    I don’t know and I would like your suggestion on this hypothesis: If the springs are 120mm, having the wire 2.5mm (instead of 2mm) I would still get good resistance.
    What do you think?
    These are theoretical reasonings also because I haven’t seen your test of your Rocker Plate.
    Hello, thanks and see you soon 😉

    Reply
    1. andrew the builder says:
      October 31, 2023 at 2:36 pm

      Domenico, thanks! I would be lying if I told you I knew anything about compression rates of springs. A lot of this has been done solely based on “feel”. I’d suggest giving it a shot.

      Reply
    2. Marco says:
      November 15, 2023 at 10:24 am

      Ciao Domenico,

      I come from Italy too and I am very interested in realising this project of Andrew, whom I thank :).
      However, I am having difficulty finding the various parts (I don’t have much experience on this stuff). Could you suggest where you got them, whether online or in some shop (Tecnomat?), and how much did you spend more or less?

      For example, I found this rod:https://www.amazon.it/dp/B0BLKP7D55/ref=twister_B0BLKN7S4C?_encoding=UTF8&th=1
      but it only measures 1000, not 1400 as expected.

      Thank you!

      Reply
      1. andrew the builder says:
        November 15, 2023 at 4:37 pm

        Thank you! I would recommend shopping on ebay/aliexpress for the parts. I’m not sure what suppliers are available in Italy, so I’d be lying if I recommended anything.

        Reply
  20. Jan Wijma says:
    October 30, 2023 at 9:33 am

    Hey Andrew! It seems that the link to v2 is broken. Is there any place I could find those? Do you know if this design will fit an Elite Direto x?

    Thanks!

    Jan

    Reply
    1. andrew the builder says:
      October 31, 2023 at 2:34 pm

      I have updated the links, I’ve had people use Elite Direto Xs with my rocker plate design.

      Reply
    2. Christian says:
      October 14, 2024 at 1:43 pm

      Hi,

      Did you give this a go with a direto?

      I am thinking of trying, but as far as I can see, the widest point of this rocker plate (the V1) is 802.208 mm, and with the feet extended, the direto measures 830mm in widt.. So the feet will be sticking out from the top plate..

      Reply
      1. andrew the builder says:
        October 16, 2024 at 11:24 pm

        I actually had a guy use it with a direto, but he folded one of the legs in at a 45 degree angle. I tried to find the photos, but had no initial luck. If I come across them I will share.

        Reply
  21. KEVIN LUCAS says:
    November 15, 2023 at 7:17 am

    Andrew,
    Your work is phenomenal and it’s amazingly generous of you to share. Thank you!
    I’m going to dive in. I’ve found most of what I need, but the springs are eluding me. The provided amazon link isn’t available. Do you have a couple you’re willing to sell & mail?

    Reply
    1. andrew the builder says:
      November 15, 2023 at 4:36 pm

      sure, shoot me an email, anything at andrewgrabbs.com I’ll arrange a shipment.

      Reply
      1. KEVIN LUCAS says:
        November 16, 2023 at 8:14 am

        I realized I could scroll your parts chart to the right, then could see the link for the spring at Allied and was able to purchase them (5 minimum) there. I wasn’t able to delete the comment I’d posted asking you if you had some, due to it waiting on approval, and next comment blocked meanwhile I suppose. Thanks for being willing to ship some. A day’s worth (3 for me) of coffees await you, thanks to Scott Lawson’s suggestion you took. Most of my supplies for a build should arrive soon, decent plywood still on the search menu.

        Reply
        1. KEVIN LUCAS says:
          November 16, 2023 at 8:21 am

          And I might finally get to take up the offer of a friend. A couple of years ago I helped him move a large CNC router across the state to his shop, physically level it and set it up, reprogram it after he deleted all its calibrations, figure out how a CNC router works, and choose & set up programs and such for him to use. In turn, he said I could use it anytime I’d like. A two and a half hour drive to visit and play on the machine seems in my future.

          Reply
          1. andrew the builder says:
            November 16, 2023 at 12:48 pm

            that’s awesome! If you remember, send me some updates when you get it all finished. I love seeing some good CNC work.

  22. Scott A Lawson says:
    November 15, 2023 at 4:25 pm

    Andrew- if you set-up the “Buy me a coffee” app, I’ll definitely tip you for sharing this with the world. I could’ve figured it out, but you’ve saved me an incredible amount of time and multiple mistakes. FYI- I got several bids for the CNC work- one was for $433 and another was $150. I have no idea what a fair market price on this is but definitely worth shopping around!!!

    Reply
    1. andrew the builder says:
      November 15, 2023 at 4:45 pm

      Scott, I’m glad it was helpful. That’s always my goal. I hope you find a good deal on the CNC’ing and I took your suggestion and made a “buy me a coffee” button! Thank you!

      Reply
  23. Oscar says:
    November 19, 2023 at 5:27 pm

    Hi Andrew,

    Will the V3 be available in Multi printabel?

    Looking forward to start the project for my Wahoo Kickr..

    Reply
    1. andrew the builder says:
      November 19, 2023 at 6:11 pm

      Unfortunately, I have no plans to. A nice guy on the Facebook Rocker Plate group page made print outs for the V2.

      Reply
    2. Oscar says:
      November 22, 2023 at 2:23 pm

      Thank you for quick answer. Did not fond the v2file in the fbgroup so I went for the V1. Question: How do I center the trainer the easiest way on the top plate (Wahoo Kickr).

      Reply
      1. andrew the builder says:
        November 22, 2023 at 3:01 pm

        On my design there is a center line. I try to get the bicycle + trainer centered as best as possible to that line and then add the counter weight as necessary.

        Reply
  24. Lee Hayward says:
    November 26, 2023 at 10:13 pm

    Hey Andrew, great work with the design and thanks for posting.

    I’m currently using a Wahoo Kickr Core and wondering where this is compatible with your design? I’m looking to assemble all the parts together and get building soon.

    Cheers,
    Lee

    Reply
    1. andrew the builder says:
      November 26, 2023 at 11:05 pm

      Thanks Lee!
      The Kickr Core should work fine with the V3 design.

      Reply
      1. Lee Hayward says:
        December 5, 2023 at 7:37 pm

        Great thanks for the reply Andrew. Would I be right in assuming that V3 is essentially the same as V1 with a wider profile at the rear to accommodate the wider trainers? I’ve bought SCS20UU and proceeded with the V1 design using the multi page template, and now recognise that it isn’t wide enough for the Kickr Core, so perhaps hoping / thinking I can widen the rear of the V1 design to accommodate the Core without too much other modification. I’m planning to use risers in the build.

        Cheers,
        Lee

        Reply
        1. andrew the builder says:
          December 6, 2023 at 6:37 pm

          Lee,
          That’s correct, the V3 is just wider rear platform. It also has a lot more material removed from the base, but this was to reduce shipping weight, it’s not necessary.

          Reply
  25. David says:
    November 29, 2023 at 1:32 am

    Hey Andrew,
    Thanks for your excellent designs and video. I’ve bought all the parts (using your links), and am about to start building one. The only CNC place I could find in the area has a $300 minimum, so between that, and the cost of some nice birch ply, I figured I’d just buy this KOM rocker plate: (https://komcycling.com/collections/indoor-accessories/products/rocker-plate-rpv1), and cannibalize the plates from it, as well as the balls. I like the look and the finish, and it saves me some running around. (I will need to router out some channels on the lower plate for the fore/aft ball movement.)
    I do have one question: I have the SCS20UU linear bearings, and they don’t seem to rotate easily on the rod – the linear motion is smooth and fluid, but the rotation around the rod requires some force. Is this expected with new bearings? Will it resolve once I have the leverage from the top plate? The bearings in your video seem to spin around freely – just worried I may have got some defective ones.
    Thanks again for these resources, and for responding to everyone’s questions!
    David

    Reply
    1. andrew the builder says:
      November 29, 2023 at 2:40 pm

      David,

      Thanks for the support! As for the linear bearings, they should be fine, once you load them up with weight I don’t imagine you’ll notice them “sticking”.

      Reply
      1. David B Schnake says:
        December 21, 2023 at 1:08 am

        You’re right: Got it built, and they move fine, side to side. They are a little rough fore and aft, however. Do you recommend adding a little machine oil?
        Posted to the FB Rocker Plates Group:
        https://www.facebook.com/groups/415329188897706/permalink/1815140525583225/

        Reply
        1. andrew the builder says:
          December 21, 2023 at 3:01 pm

          David,

          I always throw a little grease inside the bearings and on the rail just for longevity of the bearings and rod. I’m sure machine oil would be fine.

          Reply
  26. Christopher Martinez says:
    December 6, 2023 at 4:44 pm

    Have you determined if there would be a weight limit rider and bike. I’m a bigger guy about 275lb with my surley midnight special, and kicker core with axis feet

    Reply
    1. andrew the builder says:
      December 6, 2023 at 6:43 pm

      I have not determined how much weight it can hold; however, the weakest link would be the linear rod bearings. That being said, the kilogram-force of these bearings is pretty high. Here is the chart that outlines the kgf of a single bearing: https://cdn1.bigcommerce.com/n-ou1isn/1mog83/product_images/uploaded_images/linear-bearing-dimensions3.jpg

      Reply
  27. Daniel says:
    December 7, 2023 at 7:43 am

    Hi!
    Really appreciate the drawings, i have sourced all the needed parts and are in the hunt for a CNC-shop to get the plywood cut out.
    One question regarding lengt of the top-plate. I ride a size L Scoot Speedster gravelbike, and its about 145 cm from back of trainer to where i would prefer to strap the front tire. How mutch do i need to lengthen the front of the plate and the holes for the straps, or can i just cut it out without any mods?

    Best regards from Sweden
    Daniel

    Reply
    1. andrew the builder says:
      December 7, 2023 at 12:57 pm

      Daniel,
      The board is about 152.4cm in length, as long as you back the trainer up to the back I think you’ll be fine.

      Reply
  28. Michael Elgaard says:
    December 20, 2023 at 6:28 am

    Hi Andrew.
    Nice work you have done.
    Do you have access to DGW or DXF files that you want to share, then it is possible to edit the files.

    Reply
    1. andrew the builder says:
      December 21, 2023 at 2:57 pm

      I do not, unfortunately.

      Reply
  29. Christopher Martinez says:
    December 20, 2023 at 8:42 pm

    With the version one plans and using the clamps for the trainer, did you have any issue with clearance with a 6 inch exercise ball and the bolts on the underside of the top bored just wanted to make sure it does not get too close to puncture it. It’s hard to see the angle in your video. it also looks like you just drilled one hole for that bolt and not the two slits for a Velcro strap

    Reply
    1. andrew the builder says:
      December 21, 2023 at 2:59 pm

      Christopher,
      I didn’t get the chance to use 6″ balls, but I don’t think they pose that big of an issue assuming they are pliable enough and you can get them wedged in there. I only inflate the balls enough to give them some shape, stick them in and pump them up in place to the desired PSI.

      Reply
  30. Christopher Martinez says:
    December 20, 2023 at 8:48 pm

    My other question in regards to spring location between the bearings and your video how you have it shown is this with the appropriate spacing where the screw holes are on the top plate?

    Reply
    1. andrew the builder says:
      December 21, 2023 at 3:00 pm

      The video was a prototype and the schematics are updated. The springs should go between the standoffs and the linear bearings.

      Reply
  31. Brian Anderson says:
    December 28, 2023 at 12:43 am

    Hi Andrew is there still an available source for springs and balls for your rocker plate design. I’m in the process of building one and having trouble sourcing the springs and balls.

    Brian

    Reply
    1. andrew the builder says:
      December 29, 2023 at 5:34 pm

      Brian, are you in the states? I can sell you some I have left over.

      Reply
      1. Brian Anderson says:
        January 3, 2024 at 7:40 pm

        I am in the states (Massachusetts), I found the springs but still need the balls. I know they are available and people use all types but the links in your doc come up unavailable. What are you using?

        Reply
        1. andrew the builder says:
          January 5, 2024 at 1:49 am

          Mostly 5″ playground balls. Here are some: https://amzn.to/4aKvmmH

          Reply
      2. Martin says:
        January 15, 2024 at 7:55 pm

        How much would you sell a pair for? Im in Charlotte NC

        Reply
  32. Deon Greenwood says:
    December 29, 2023 at 4:26 pm

    Hey will this V3 also accommodate a kicker bike ?

    Reply
    1. andrew the builder says:
      December 29, 2023 at 5:33 pm

      Yes it will. I use my Kickr Bike on it with no problem.

      Reply
  33. Sharon says:
    December 30, 2023 at 4:45 pm

    I can’t seem to source a 5×5 piece of plywood in my area. Do you think this could be done on two 4×4 boards if placed diagonally?

    Reply
    1. andrew the builder says:
      January 5, 2024 at 1:46 am

      That I am unsure of. The only thing that may cause an issue would be the back end of the top plate. You should be able to mock it up in the CNC software you’re using and see.

      Reply
  34. Patrick White says:
    January 2, 2024 at 7:03 pm

    Can I ask why on V3 files the top plate is in imperial and the bottom plate is in metric. If I just scale the imperial up 25.4 will that be accurate enough?

    Reply
    1. andrew the builder says:
      January 5, 2024 at 1:48 am

      Most of the bolts and measurements I used were metric, but the birch plywood sheets I could get were all imperial. Likely I just missed a conversion in solidworks. If you’re referring to the print outs, another guy labeled all of those.

      Reply
  35. Patrick White says:
    January 15, 2024 at 7:40 am

    Hello Andrew,
    Where do the springs go on V3? It looks to me between the 2nd & 3rd Linear Rod Supports & Linear Bearings. I have my vectors drawn in Aspire for toolpaths and hardware locations. Is there a way I can share that with you. The Dimension between the 2nd & 3rd Linear Rod Supports & Linear Bearings is 3.625 +/- which would compress 5 1/4″ spring 1 5/8″ which is more then 1/2″ you motioned in your video. Something seem of to me.

    Reply
    1. andrew the builder says:
      January 15, 2024 at 6:03 pm

      Patrick, you are correct. There are two linear bearings that go in the center of two linear rod supports. The space between each linear rod bearing and support will need a spring.

      Reply
  36. Patrick White says:
    January 15, 2024 at 8:21 pm

    Andrew
    Yes I have the springs. But my question is the compression of the 5 1/4″ spring to 3 5/8″.
    Does that give your desired motion and is it fairly stiff?

    Reply
    1. andrew the builder says:
      January 16, 2024 at 1:23 pm

      it works really well for the ones I have built, if you want less maybe you can cut them?

      Reply
  37. Anthony says:
    January 22, 2024 at 4:59 am

    Hi Andrew,
    Mate I’ve converted the Scs20uu v3 to pdf then scaled to 525% it seems like the holes align well enough. Just checking to see if you know before I start cutting

    Reply
    1. andrew the builder says:
      January 22, 2024 at 3:01 pm

      My apologies, but I don’t know the first thing about PDF conversions and what % would work. A nice guy on the facebook group did the original multipage conversions. You may have luck asking the group.

      Reply
      1. Anthony says:
        January 22, 2024 at 8:06 pm

        Thanks for the reply Andrew
        Thought it might be a long shot but worth a go. I think I’ve sorted it. The measurements between the holes for the bearings and mounts are spot on so I’ll run with it
        Cheers again for your designs

        Reply
  38. Richard K says:
    January 24, 2024 at 7:00 am

    I was having troubles to find a suitable ball for this design. In Europe the recommended rubber balls don’t seem to be available. I tried 3 different small size balls from Decathlon and the best in terms of size, size consistency, keeping air and robustness appears to be the “ATORKA HB500B Size 1 Beach Handball – Yellow”.

    It is about 15cm / 6″ in diameter, 250g, a more robust and thicker walled ball, but I still managed to get it slide into the bottom slot and seems to be working well. I don’t have long term experience with it.

    Reply
    1. andrew the builder says:
      January 24, 2024 at 2:49 pm

      that’s good to know, Thank you for sharing!

      Reply
  39. Noe Espinosa says:
    January 26, 2024 at 6:19 pm

    I have a newer model Wahoo Kickr that I’m planning to bolt directly into the top plate using longer bolts like you mentioned in the video. Do you have specifics on length and size?

    Reply
    1. andrew the builder says:
      January 27, 2024 at 4:33 pm

      I used M10x100mm bolts. These ones to be exact: https://www.fastenal.com/product/details/11506188

      Reply
  40. Ryan says:
    February 5, 2024 at 2:48 pm

    What bit[s] do you use for the CNC? Do you use a roundover for the outside edge & handles? Thank you!

    Reply
    1. andrew the builder says:
      February 12, 2024 at 4:53 pm

      Ryan,

      I don’t actually have a CNC, I take the DXFs to a local company and they handle the processing.

      Reply
  41. Yuriy Havryliv says:
    February 8, 2024 at 9:36 am

    Hi Andrew, many thanks for the blueprints and videos. I have just completed my rocker plate. It’s an awesome build and first ride was great

    Thanks again

    Reply
    1. andrew the builder says:
      February 12, 2024 at 4:54 pm

      I am glad to hear it. Cheers!

      Reply
  42. Andrew says:
    February 21, 2024 at 6:38 pm

    Hey Andrew!
    Random Questions….. I’ve been using my V1 based on your design for ~2 trainer seasons but I had a few questions.

    I placed my Springs as you had in the initial V1 Videos….. ie: (counting from the front of the board) with a spring behind the 2nd Linear Road support and just before the last (4th) linear road support.
    I had two concerns:
    – The bottom plate sticks out ~10cm in front of the top plate when mounted this way….is that normal?
    – I occasionally get ‘sticking’ in when the top plate slides forward…..

    I tried to correct both issues by moving the back spring forward, to the location shown in your 3-Image at the top of this page….Interestingly, that made the Top and bottom plates line up (the way I assume you’d intended), but now I get contact between the linear bearing and the rod support (mostly when standing up – presumably the affect of ‘throwing’ the bike backwards).

    Is there anything that changed Re: the rod support spacing or your recommended Spring placement?

    Thanks!

    Reply
    1. andrew the builder says:
      February 21, 2024 at 10:49 pm

      Sorry to hear about the issues!

      Depending on how you made your top plate, there should be two linear bearings between two stand offs. There should be a spring between each bearing and it’s immediate stand off. This should “self center” the top and bottom plates. The sticking you are referring to makes me thing you don’t have enough clearance between your linear rod stand off and your top plate. This can be achieved with a few mm of spacers between the top plate and then linear bearings.

      Reply
  43. Tim Deakin says:
    February 26, 2024 at 12:14 pm

    Hi Andrew. Thanks for this. I’m currently adapting your DXF to custom fit my bike and HubOne trainer. I did note that in the video that shows you riding, the compression springs are in a different position than in the video showing the assembly. The latter shows one spring at the back and the other in the middle section. On the DXF, the distance between the mount and first bearing (back end) is greater than the length of the spring so there would be no pre compression. Obviously, it’s easy to adjust the design to suit but which is the best option in terms of spring placement? Thanks again. Tim (UK)

    Reply
    1. andrew the builder says:
      February 26, 2024 at 12:58 pm

      That is correct, in the video there the rocker plate is a very early prototype. To reduce the materials needs and to have the two plates self center, I scrapped that design and placed the two inner bearings the same distance from each of their rod supports. This should create the pre-load on the springs.

      |SB–BS|
      | = stand off
      S = spring
      B = bearing.

      Reply
  44. Brian Anderson says:
    March 4, 2024 at 1:51 pm

    Andrew, will a 2020 Kickr fit on the V1 version of your design?

    Brian

    Reply
  45. Kamil says:
    April 5, 2024 at 11:18 am

    V3
    There seems to be a problem with the scale in these files. One element measures 581,201 x 1524 mm, while the other is only 31,624 x 59,865 mm.
    What are the correct sizes?

    Reply
    1. andrew the builder says:
      April 5, 2024 at 1:58 pm

      they should be 60″ in length.

      Reply
  46. Kamil says:
    April 5, 2024 at 1:45 pm

    shouldn’t
    10 Bottom Plate Bolts 6EY59 M6-1.0 30mm 16
    be 8pcs instead of 16?

    Reply
    1. andrew the builder says:
      April 5, 2024 at 1:58 pm

      yes, the bottom rod supports only require 2 bolts.

      Reply
  47. Patrick White says:
    April 15, 2024 at 1:35 pm

    Hello Andrew,
    I just machined one of these on the CNC. I found when assembling that I needed to put a 1/8 spacer on top of the linear bearing in order for the top plate to rock with out hitting the 20mm rod mounts.

    Reply
  48. Patrick White says:
    April 15, 2024 at 1:43 pm

    Andrew,
    Sorry I missed the note about the risers. That is exactly what I did. Thanks

    Reply
  49. Jimmy says:
    May 13, 2024 at 10:31 am

    Hey Andrew,

    I asked a friend if he could CNC the plates for me. Unfortunately, he said he couldn’t because the files are in imperial measurements instead of metric. Could you provide files with metric measurements?

    Reply
  50. Nick says:
    June 2, 2024 at 6:01 am

    Andrew, thanks for sharing this! Quick question, do you know if the top and bottom plates will fit on a 4 x 8 sheet? I know you said they fit on a 5 x 5 sheet side by side, so I’m thinking they would fit on a 4 x 8 more like you have them stacked in your dxf file video but want to confirm. Thank you!

    Reply
  51. James B says:
    June 12, 2024 at 12:56 am

    Andrew, the local printshops are all telling me the single printable is a small image – 3 x 7 inches & 4 x 8 inches. How to I get the files to by the right size to print for the top and bottom boards? Thanks for everything here, so close to getting the rocker board up and running.

    Reply
  52. Ivo says:
    July 2, 2024 at 9:06 am

    Hi,
    Firstly, thank you for all the knowledge you are willingly sharing amongst the cyclo-selfbuild-enthousiasts! Thumbs up!
    With regards to availability, I will be using slightly different types of rod supports and bearings. I have two questions connected with it;
    1. What should be the space between the upper and lower plate? I would like to buy also the correct sized balls.
    2. How much does the upper plate tilt in reality? Or let me put it this way – how much clearance (angle) for tilting should it have? I will need to order custom risers, but I would like to calculate the correct size.
    Many thanks and keep up the good work!

    Reply
    1. andrew the builder says:
      August 1, 2024 at 12:33 am

      1. You should have around 2-4 inches depending on how many risers you use.
      2. Realistically your probably going to get about 3-4 degrees.

      Reply
  53. Matthew Adams says:
    September 4, 2024 at 9:54 pm

    Hi Andrew – firstly, thanks so much for the awesome videos & plans!

    I’ve ordered the bearings, and plan on building the two plates soon – but first thought I’d check on which version of the WeRideSouth rocker plate I should build for my bike + trainer. I have ordered SCS20UUs and SK20s, and will source a 1400mm rod here in New Zealand.

    I have a Wahoo Kickr v1 (<2016), and the contact patch of my trainer bike's front tyre (ie where the front tyre will sit on the top plate) is 155cm from the rear-most part of the trainer.

    Matthew

    Reply
  54. jhon says:
    January 3, 2025 at 3:05 am

    Hello Andrew, congratulations for providing all the information on this channel.
    I’m not good at interpreting plans and in the printables (simple) there are some measurements that I can’t find.

    Your help is possible? Thank you

    Reply
  55. louis says:
    January 3, 2025 at 5:20 pm

    Andrew what is the width of the plates
    the dimensions are cut off in the files you provided
    thx in advance

    Reply
  56. Art Tawatari says:
    April 7, 2025 at 10:58 pm

    Hi Andrew,
    Thanks for sharing your excellent plans. I’m going to try and make the rocker without the CNC. I do not see anywhere in your plans what the width of the top and bottom plate are. Could you give me those dimensions at their widest point. Thank you. Art

    Reply

Leave a Reply to jhon Cancel reply

Your email address will not be published. Required fields are marked *

Andrew

This is a picture of the guy who writes all of this non-sense.

  • November 15, 2024 by andrew the builder DIY Shimano Di2 Satellite Shifter for Coefficient RR Carbon Handlebars
  • December 24, 2023 by andrew the builder FAN-CTRL Update
  • October 8, 2023 by andrew the builder The Tour das Hugel Build
  • September 22, 2023 by andrew the builder My 2024 Cycling Calendar
  • March 18, 2023 by andrew the builder We Ride South DIY Rocker Plate Plans
@2023 andrewgrabbs.com